Student Print
For easy printing from your personal device, use the secure online Web Print portal to upload documents and manage your printing credit. You can also use Student Print directly from your device, or print directly from a Library computer.
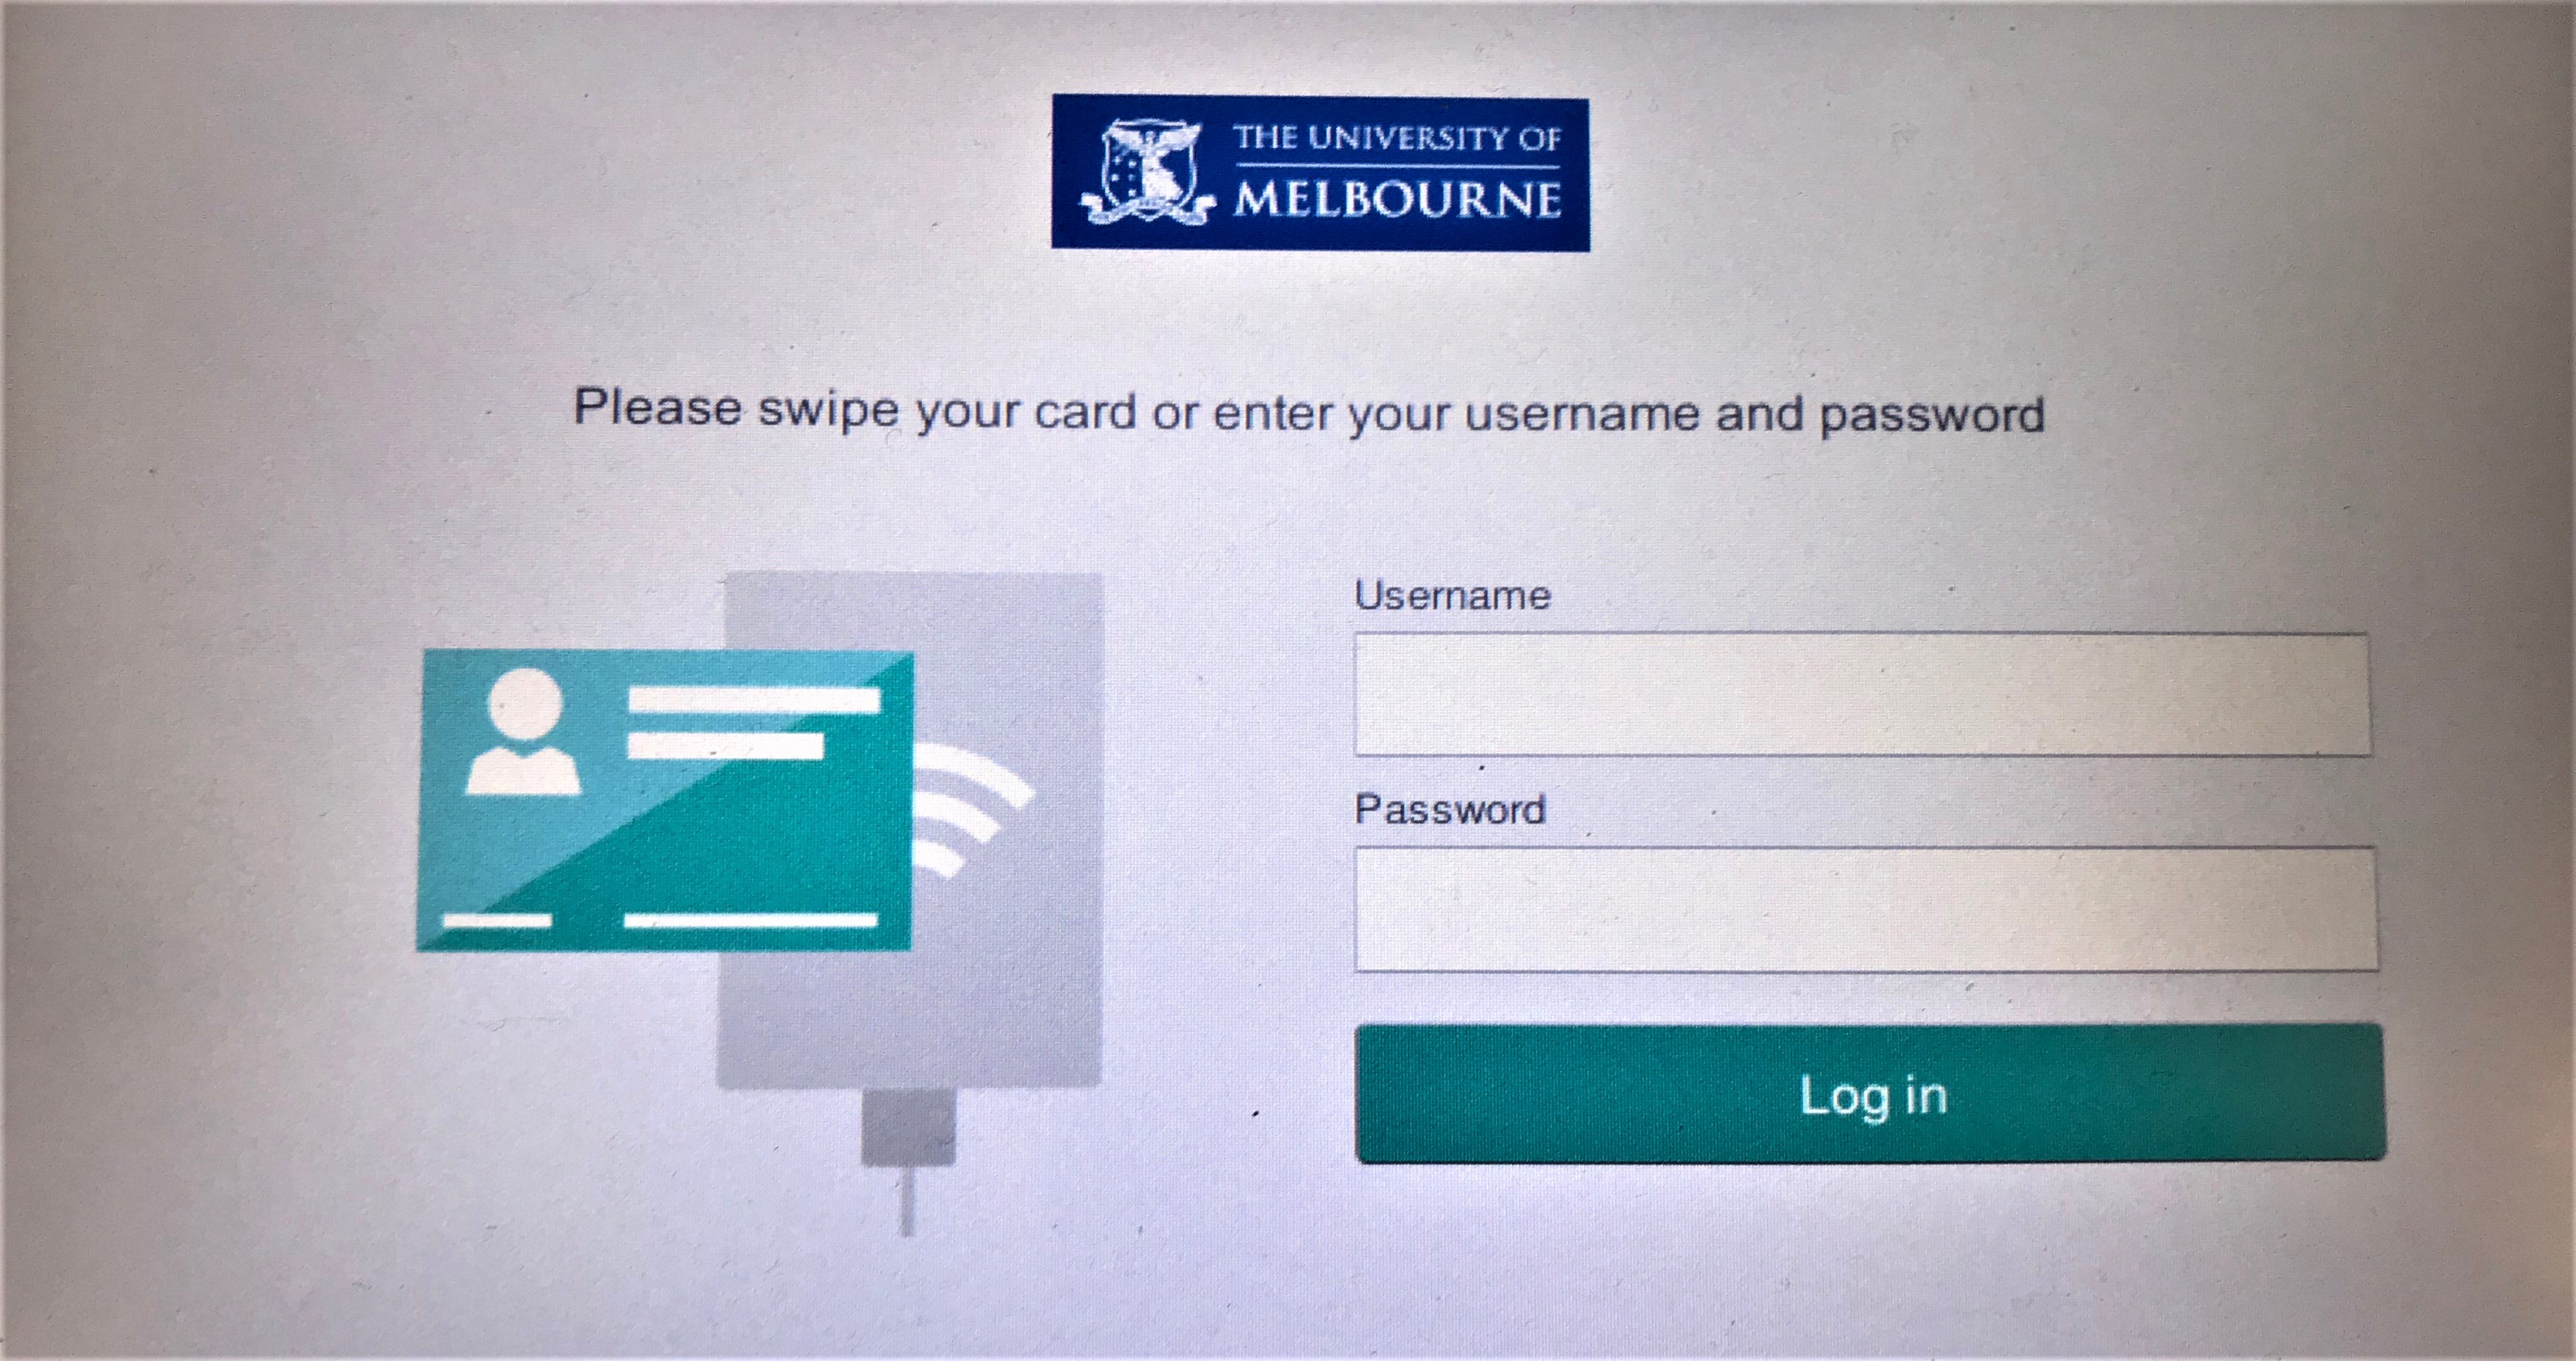
Once you have submitted your job, simply find your nearest printer or Multi-Function Device (MFD), tap your Student ID card, and release your job(s). If you don't have your Student ID card, simply login at the printer touchscreen with your credentials.
In addition to printing, MFDs (located in major libraries and selected locations) allow you to scan and photocopy documents. View the quick reference (PDF) guide for instructions to help you print, scan and copy.
Overview
| Different ways to print | Size | B&W / Colour | 1-sided / 2-sided |
|---|---|---|---|
| Web Print (print.unimelb.edu.au) Print by uploading your document to web print | A4 only. | B&W and colour both available, select when uploading. | 1-sided and 2-sided both available, select when uploading. |
| Bring-your-own-device (Setup) Print from your own device such as a laptop. | A4 by default, A3 size available. | Separate queues.1 | Separate queues.1 |
| Library computer (How-to) Print from a computer located in a library on campus | A4 by default, A3 size available. | B&W by default, colour option available. | 1-sided by default, 2-sided available. |
| Print from USB2 (How-to) Print directly from the multi-function device (MFD) using your USB | A4 only. | B&W by default. Change to colour on the MFD touchscreen. | 1-sided by default. Change to 2-sided printing on the MFD touchscreen. |
1 For printing from a personal device, there are four separate printer queues available for installation: studentprint_bw_1sided, studentprint_bw_2sided, studentprint_colour_1sided, and studentprint_colour_2sided.
2 USB drives must be in a compatible format to print from. Files printed from USB drives must be in PDF, JPEG or TIFF format. Only A4-sized documents will print.
Pricing
| Print/Copy (A4) | Print/Copy (A3) | ||
|---|---|---|---|
| Black and White | 1-sided | $0.15 | $0.26 |
| 2-sided | $0.29 | $0.50 | |
| Colour | 1-sided | $0.20 | $0.40 |
| 2-sided | $0.38 | $0.76 |
Scanning is free of charge. Prices shown above are correct as of March 2022.
Locations
Printers and Multi-Function Devices (MFDs) are available in every major University library (including Baillieu, ERC, Giblin Eunson, Brownless, Law, Southbank, Burnley and Werribee libraries). Please view our campus maps to find these libraries. Detailed location information for Printers and MFDs is available for the campuses in tabs below.
| Building | Level | Room | Asset Number |
|---|---|---|---|
| Baillieu Library (177) | Ground | G27 | UOM147152 |
| Ground | G28 | UOM147143 | |
| Ground | G29 | UOM147154 | |
| Ground | G62 | UOM147192 | |
| Brownless Biomedical Library (182) | Ground | G17 | UOM147167 |
| Eastern Resource Centre - ERC (171) | Basement | - | UOM147161 |
| Level 3 | - | UOM147159 | |
| Giblin Eunson Library (105) | Ground | G25 | UOM147162 |
| Ground | G29 | UOM147163 | |
| Upper Ground | UG30 | UOM147164 | |
| Kwong Lee Dow Building (263) | Ground | G12 | UOM147175 |
| Law Building (106) | Level 3 | 308 | UOM147169 |
| Level 3 | C309 | UOM147170 | |
| MSD - Glyn Davis Building (133) | Ground | G36 | UOM147174 |
| Building | Level | Room | Asset Number |
|---|---|---|---|
| The Hub (863) | Ground | G13A | UOM147201 |
| Ground | G21A | UOM147158 |
| Building | Level | Room | Asset Number |
|---|---|---|---|
| Swinburne Hall (507) | Ground | G06 | UOM147151 |
| Building | Level | Room | Asset Number |
|---|---|---|---|
| Burnley Library (914) | Ground | G03 | UOM147188 |
| Building | Level | Room | Asset Number |
|---|---|---|---|
| Werribee Learning & Teaching Building (418) | Ground | G05 | UOM147157 |
Recharging and refunds
-
Loading funds to your student card
Topping-up online
- Login to the Web Print portal.
- Select 'Account Recharge'.
- Re-enter your password and select 'Sign In'.
- Enter recharge amount and select 'Continue'.
- Follow the prompts with your personal and credit/debit card information.
- Your payment will be processed, and a 'Success' message will be displayed.
Topping-up at a recharge kiosk (Photo guide)
- Tap your Student ID card, or click Recharge and enter your username & password.
- Select your recharge amount: $5, $10, $15, $20 or $25.
- Use the EFTPOS terminal to complete the transaction, using your credit/debit/bank card.
Topping-up can only be completed using a credit/debit/bank card.
-
Refund of credit (misprint)
Any amount lost due to printing issues (e.g. paper jams) will be refunded on a case-by-case basis. Please submit your request via logging on to the Web Print portal. Select 'Recent Print Jobs', select the relevant print job, and click on 'request refund'.
-
Refund of balance (leaving UoM)
Balance Transfers can be made using the Student Print Support form. Select 'Balance Transfer' as issue type.
Balance Transfers are for when students leave the University and would like to request a refund for any remaining balance on their card. Your refund would normally be paid back onto the same credit card you used for recharging. All refunds will be made at the discretion of the University.
Photocopying and scanning
-
How to copy
- Tap your Student ID card or enter your username & password and select ‘Log In’.
- Select ‘Access Device’ icon.
- Select ‘Copy’.
- Place your document on the flatbed scanner, or organise your pages in the document feeder.#
- Select your desired options.
- Enter the number of copies using the numeric keypad.
- Press the ‘Start’ button.
# Only 30 pages at a time may be fed into the scanner, if using the document feeder.
-
How to scan
- Tap your Student ID card or enter your username & password and select ‘Log In’.
- Select ‘Scan’.
- Your email will show under ‘To’ (this is defaulted to your student email account).#
- Place your document on the flatbed scanner, or organise your pages in the document feeder.
- Press the ‘Start’ button.
- Select 'Preview', 'Send' and then 'Finish'.
Notes
- Scanning is free of charge.
- Scan-to-email has 20MB file size limit.
- Scan-to-USB has no file size limit.
- Only 30 pages at a time may be fed into the scanner, if using the document feeder.
# Guests will need to manually input their email address to send scans to.
-
Scanning to Google Drive
- Tap your Student ID card or login using your credentials and select the 'Scan' menu button.
- Two options will appear, select 'Scan to Google Drive'.
- The option to change the scan details will appear. The title of the scanned file can be changed under 'Filename' and the colour and size of the scan can be changed by selecting 'Change settings'.
- Place document onto feeder glass.
- Select 'Start'.
- Select 'Preview', 'Send' and then 'Finish'.
- Once the scan is complete, you will receive an email to your student email address asking to associate your Google Drive with PaperCut.
- Complete the authorisation process on the email, and scans will appear in your Google Drive.
Scanning to Google Drive is unavailable for guests.
Printing How-To's
-
Printing from personal devices
The web print feature allows you to print from your personal devices. Alternatively, you can also set up the Student Print queue on your device and print natively from Windows, macOS, Android, iOS or ChromeOS. Once your document is held on the queue, tap your student card on any Student Print device to release it.
Printing from Web Print
- Login to the Web Print portal.

- Select 'Web Print' on the side navigation menu.
- Select 'Submit a Job'.
- Choose the print type.
- 'A4 Black & White one-sided'.
- 'A4 Colour one-sided'.
- 'A4 Black & White two-sided'.
- 'A4 Colour two-sided'.
- Specify the number of copies
- Select 'Upload Documents'

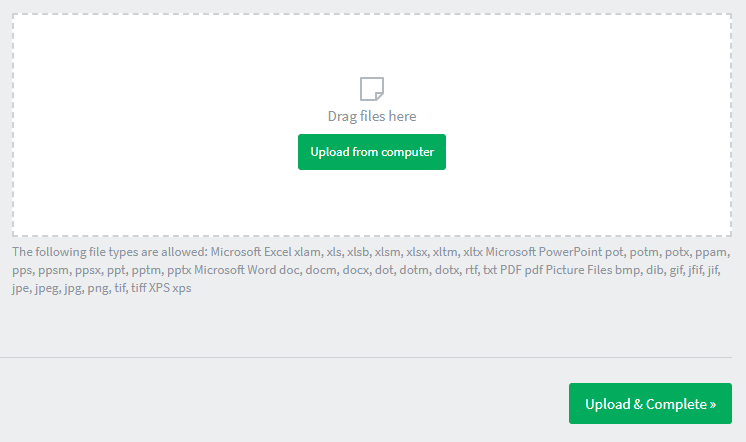
- Select 'Upload from computer' or drag the files to the box.
- Select 'Upload & Complete'.
- Go to any student printer or MFD.
- Tap the student card and select the 'Print All' button in the top right-hand corner, OR select the specific job to release.
Printing from the Student Print Queue
Printing from the Student Print Queue
- Setup the Student Print queue on your device.
- Select the Student Print queue as the device when printing from any application.
- Select 'Print'.
- Enter your student credentials to associate your document with your student account.
- Go to any student printer or MFD.
- Tap the student card and select the 'Print All' button in the top right-hand corner, OR select the specific job to release.
- Login to the Web Print portal.
-
Releasing print jobs
To release a print job or otherwise use an MFD without your student card, simply log in at the touch screen panel of any Student Print printer or MFD with your student card or credentials.
Logging in to the printer
Card Log In
- Scan your Student ID Card over the 'Scan Your Student Card Here' label.
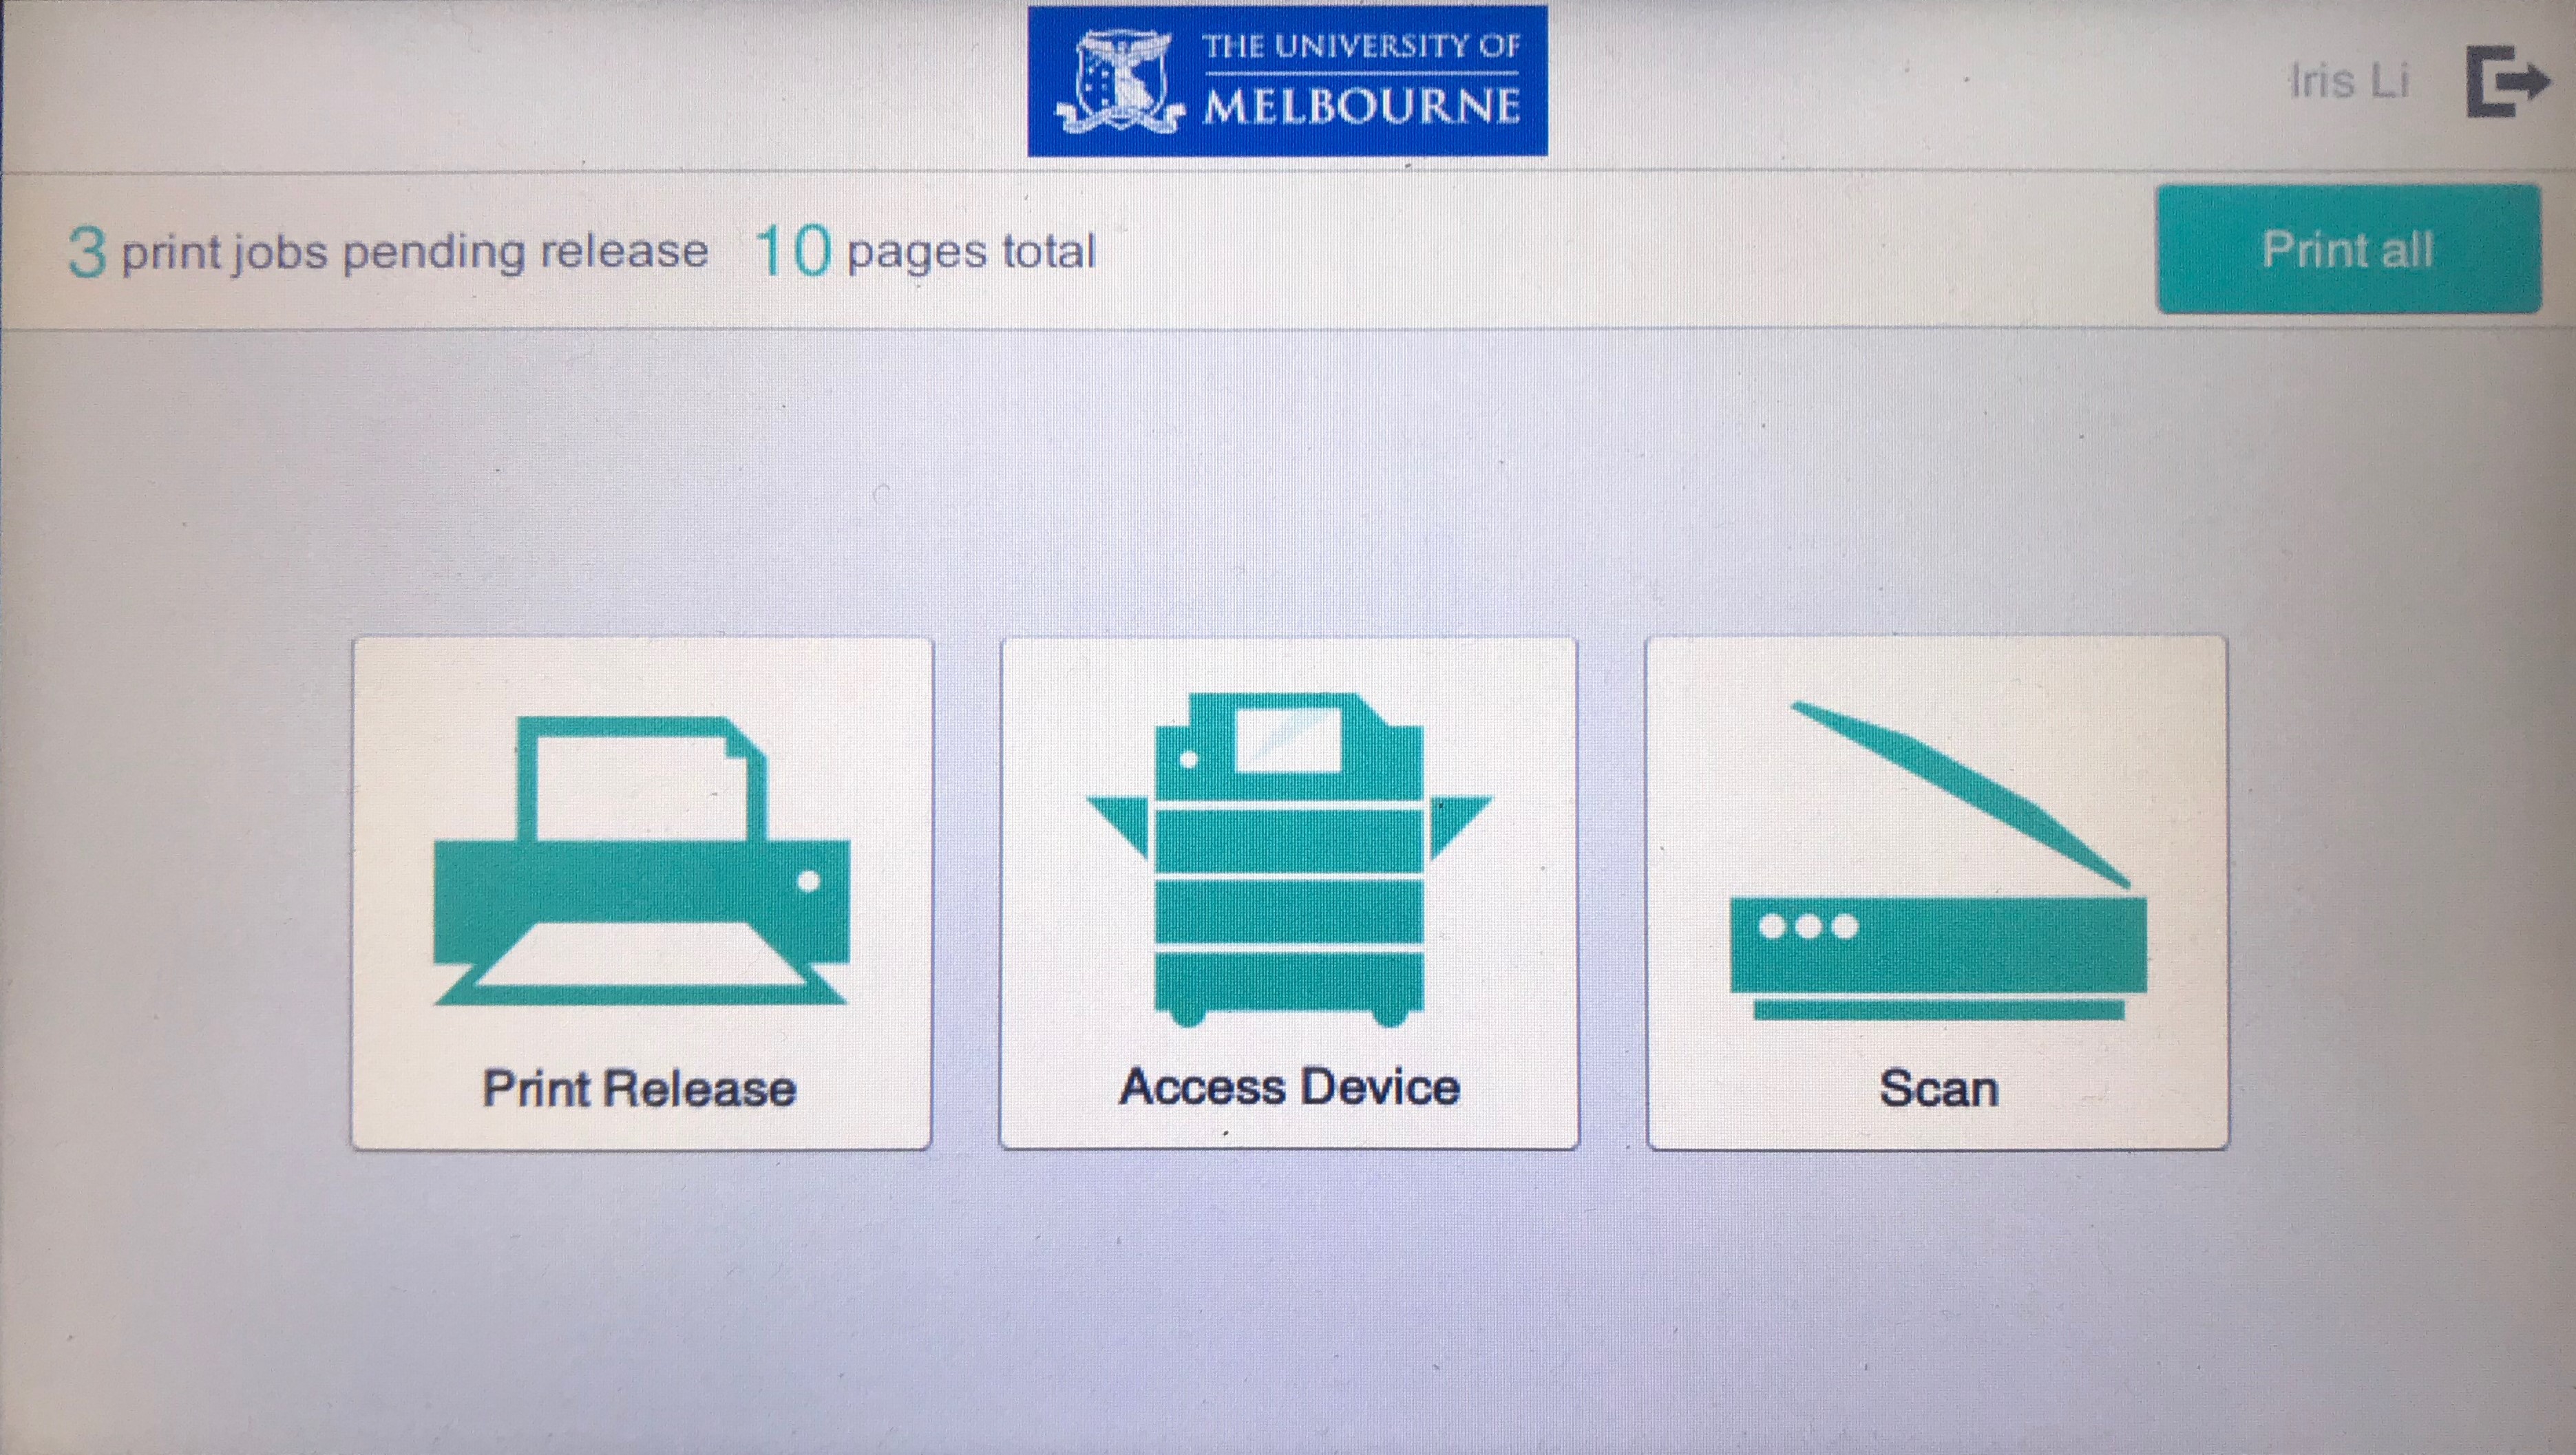
- Now that you are logged in you will see three icons
- Print Release
- Access Device
- Scan
- Navigate through the device functions.
Manual Log In

- Select the empty field under 'Username'.
- Type in your University of Melbourne username.
- Select 'Enter'.
- Select the empty field under 'Password', enter your password and select 'Enter'.
- Select 'Log in'.
- Now that you are logged in you will see three icons
- Print Release
- Access Device
- Scan
- Navigate through the device functions.
Print Release
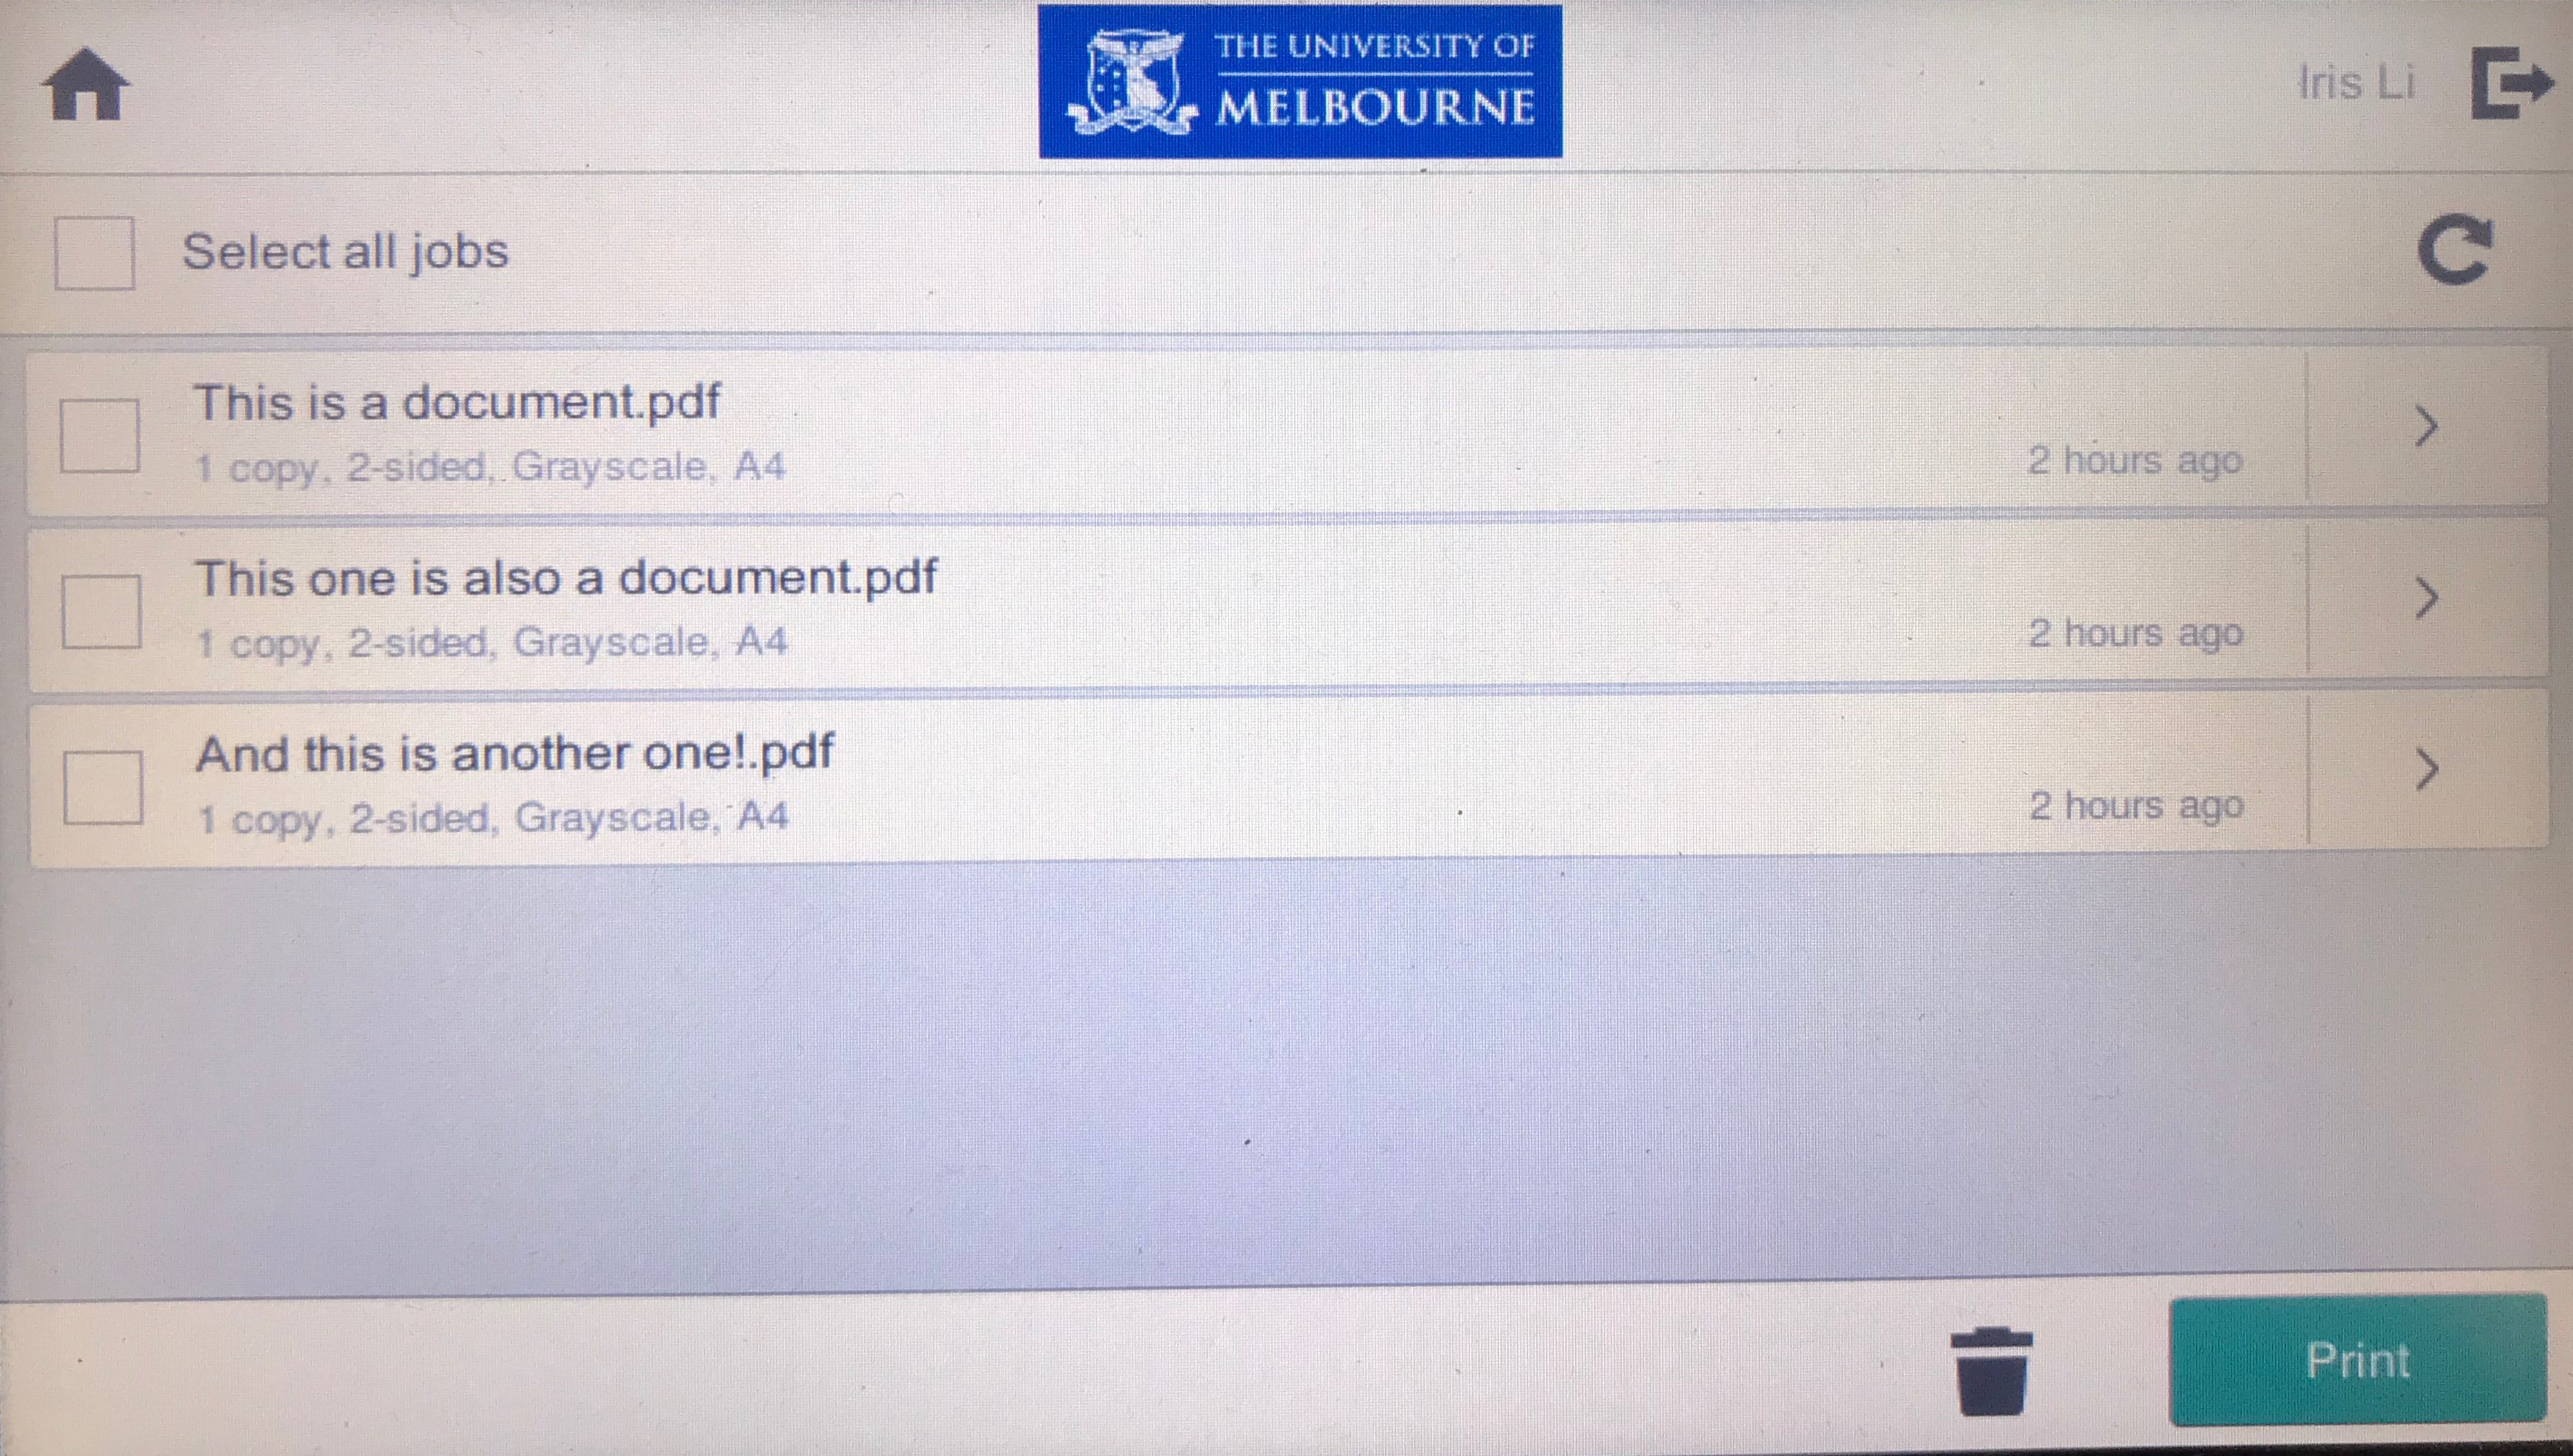
- After logging in, select 'Print Release'.
- Select the print job you wish to print.
- Select the print icon on the right-hand side of the screen to print the select job or press the ‘recycle’ icon (bin) to delete the selected job.
- Alternatively, if you have print jobs pending a ribbon will appear across the top of the screen upon login.


-
Printing as a guest
On the Web Print portal, select ‘Register as a Guest User’ and complete the guest registration process. You can upload jobs as normal using the Print Portal. To use an MFD, simply login at the touch screen panel with your guest credentials. You can then release print jobs or use the scan/copy functions as normal.
Guests can only print in A4, as library computers are only accessible to students.
User Guides
- Multi-Function Device Guide: Login, Print Release, Navigation
- Multi-Function Device Guide: Copy, Copy-Staple, Copy ID
- Multi-Function Device Guide: Scan, Print from USB, Store to USB
- Printer Guide
Contact and support
For any problems or questions with the Student Print service, you can:
- Submit a ServiceNow form (guide here)
- Use the Snap Send Solve app (guide here)
- Phone x40888 or 834 40888
-
Payment Terms and Conditions
When you top-up your balance, you will be re-directed to complete your payment with the Commonwealth Bank's BPOINT portal (Mastercard and Visa are accepted). For information on how Commonwealth Bank deals with personal information, please refer to their privacy policy.
Trading Address
University of Melbourne
Rm 404 Raymond Priestly Bldg
University of Melbourne VIC 3010
Australia